IntelliGolf
Home
IntelliGolf Desktop Data Entry Instructions

If you are using Version 9.0, or newer, of the IntelliGolf Birdie plus Eagle GPS option software you can use the Course Survey Editor to edit the locations of a golf course. If there is not high resolution satellite imagery available in Google Maps for a course you wish to survey you can use these instrucitons using other Earth Viewer software.

Version 8.00 (and above) of the IntelliGolf desktop software includes our new Earth Viewer location entry feature. Plus, you don't even need a GPS receiver to use/do it! 
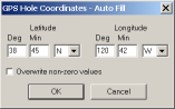
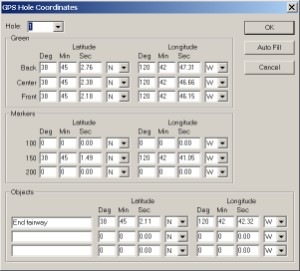
IntelliGolf will allow you to enter the coordinates for key target destinations into IntelliGolf prior to starting your round of golf. These include the 200, 150, 100 yard/meter markers, the front, center, and back of the Green, and up to three (3) custom fairway points per hole (e.g. lake, sand, tree, etc) per hole. After entering this data into the desktop software, you can synchronize it to your handheld/smartphone and you will be ready to golf!

To get started you will want to do four things:

  1. Download (or enter) the scorecard, for the course that you want to use into the IntelliGolf desktop software. You can do this by clicking here and following the course download instructions. If the course already has a "satellite icon" next to it, it has already been surveyed by a fellow IntelliGolfer. If not, acquiring and entering latitude and longitude coordinates is relatively easy to do. Instructions are listed below.
  2. Next, click here to download and then print the free latitude and longitude data entry form (in Excel) that we have created for you. Write down the full address of the course that you want to survey (e.g. street address, city, state or country) into the Form.
  3. Visit the web site of the course that you want to survey and print out their course layout (i.e. scorecard). That way you will be able to recognize the course's layout (e.g. Hole 1, Hole 2, etc) when you use one of the industry's leading Earth viewers (see #4 below).
  4. Download and install one of the industry's leading Earth viewers (e.g. Google Earth).

Earth Viewers: Set-up and Entry Instructions

There are a variety of sources/viewers for obtaining latitude and longitude data for your personal use with IntelliGolf. One such viewer is from Google Earth (www.googleearth.com). From their web site, you can download their free Google Earth (GE) software, or get their more advanced Google Earth Plus or Google Earth Pro packages. Any of these products will work fine for obtaining latitude and longitude data. To get started, simply click on Downloads (from www.googleearth.com ) and pick the Google Earth software of your choice. After installing the GE software, start up GE by clicking on the GE icon on your desktop. This is very cool software J. Once started, we recommend the following GE settings:

  1. Click on Tools, Layers, and check "Golf" (under Parks and Recreation) and "Borders". Uncheck everything else. This will show you country borders and golf courses, as you zoom-in using GE ( more later…).
  2. After #1 has been completed, click on Tools (again), and then Search. This will allow you to enter the full address of the course that you want to GPS.
  3. Click on "Fly to" and then enter the full address of the course that you wish to survey (e.g. street address, city, state or country) in the box provided. Then click on the magnifying glass icon.
  4. The GE globe will begin to spin and will you will notice GE zooming in to your course. Once it has stopped, you can double-click on this area and GE will continue to zoom-in. Do this a couple more times until to can see outlines of golf course that you wish to survey. Note: Some golf course images (within GE) are very clear. Others are not. If your course's image in very clear, you can continue. If not, you will need to GPS/Survey the course using the IntelliGPS Survey features provided within the IntelliGolf Eagle Option's handheld/smartphone software (i.e. on the course).
  5. Now that you have located your course, click on Tools and uncheck everything. This will show you a large image of your course. You're making good progress!
  6. Now that you can see an image of your golf course, do the following in GE:
    1. Click on View, Full Screen, and check it (i.e. if you are not already in Full Screen mode).
    2. Click on View (again), Status Bar, and check it. You should now see latitude and longitude data towards the bottom of the screen.
    3. Click on Tools, Measure, and check it. You should now see a Measure screen in the center of your display. Move it out of the way.
    4. As you move the cursor, you will see a square "target: box. Notice how the latitude and longitude numbers change as your move the target box around the screen (i.e. course).
  7. Move the target box to the Back of the Green and write down the latitude and longitude coordinates into the IntelliGolf form (Click here to download IntelliGps form). Do the same for the Center of the Green and for Front of the Green. Congratulations. You have just surveyed and recorded the coordinates for the Green.
  8. IMPORTANT TIME SAVER - you might have noticed that the Degrees, Minutes, (not Seconds), and Direction are all the same for each of these locations within the Latitude and Longitude columns. Only the "Seconds" values changed. As such, IntelliGolf includes a time saving "Auto-Fill" feature that allows you to enter the Degrees, Minutes, and Direction values only once per Hole, and then propagate these values throughout all of the other entries for that Hole. This will save you about 75% of the work. From now on, simply write the Degrees, Minutes, and Direction values into the Auto Fill boxes in the survey entry form. Then, you will only need to record the Minutes values from now for each location (unless you see that the Degrees, Minutes, and Direction have changed within that particular hole, which is very rare). IntelliGolf's Auto-Fill feature will save you a lot of time!
  9. Now that you have recorded the Green's coordinates, move the cursor back to the Measure screen and select "yards" or "meters" from the pull down menu.
  10. Move the cursor back to the Center of the Green and left-click with your mouse. The target box should re-appear. Now click on the Center of the Green. Notice the "dot" that GE put into the Center of the Green. Now drag you mouse down the fairway until the Measure Display shows 100 yards/meters. Write down these coordinates in the IntelliGolf form. Congratulations. You have just recorded the 100 yard/meter marker location. Do the same for the 150 and 200 yard/meter markers, and up to three (3) custom fairway locations of your choosing.
  11. Once you have completed recording the coordinates that you desire, simply start up the IntelliGolf desktop software. Click on the Courses tab, double-click on your course, and click on the Loc. (Locations) button.
  12. From this screen, click on the Auto Fill button and enter the Degrees, Minutes, and Direction values into the Auto Fill boxes and select OK. You will notice that these values are then moved into all of the corresponding boxes for the Green, Markers, and Fairway Objects (if selected). Now, you will only need to enter the Minutes values into IntelliGolf.
  13. Once finished, click on OK. Then turn on the "sync" icon for this particular course from the Courses tab (i.e. left click just to the left of the course) and then perform a desktop/handheld synchronization.
  14. Now, all of your new coordinates should reside on both your IntelliGolf desktop and handheld/smartphone software. You are ready to golf!

Congratulations!